


Hey guys, welcome to NWR blog~
This is the final part of the “3 Notion Note-Taking Ideas You Must Try” series! If you missed parts 1 and 2, where I shared the best way to create Cornell notes and introduced the highly effective QEC method, be sure to check them out
Today, we’re exploring how to create a mind map directly in Notion. If you’re a visual learner like me, you’ve probably been craving the ability to create a flexible layout without relying on external tools—because let’s be honest, setting those up can be a hassle. Fortunately, there’s a workaround using Notion’s code block - mermaid feature. In this tutorial, I’ll guide you through the steps so you can easily create your own mind maps in Notion. Perfect for starting the new semester!
Table of content
Disclaimer & Prerequisites

I will be creating my note templates in NWR Virtual Study Cafe template. You can visit my store to download it or any notes database should suffice. Additionally, you will need Notion . You can also download it using the link provided below or on my website.
What is Code Block & Mermaid Syntax
Code - Mermaid
Code - mermaid
In Notion, you can add various code blocks, and one of the language options is Mermaid. Mermaid is a syntax used to generate charts from text, including flowcharts. You can use this to create mind map-like graphics in Notion. Although using code language might seem intimidating at first, it’s actually very simple, and the way it works is quite straightforward.
We won’t cover all of Mermaid’s features here, but we’ll focus on the essentials that will help you: to, 1. create visual connections/relationshios, 2. switch the direction of your flow, and lastly 3. color code and change shapes! Below is a summary of the key Mermaid syntax we’ll be using. As you follow the youtube video or our blog guide, feel free to reference this on the way.
syntax | explnation |
---
title: {add your title here}
--- | the placeholder for the title of the mindmap |
graph LR | |
graph RL | |
graph TB | |
graph BT | |
classDef {variable name} fill:{color value} | |
id[label] | |
id((label)) | |
id(label) |
Create a Mind-map template
Step 1: Create a New Template

Begin by creating a new notebook template. Click the arrow on the blue button labeled +New, then select +Template. This is going to be the ‘mind-map’ template for future use.
Step 2: Add a Colde - Mermaid Block


On the page, type /code mermaid to create a code block specific for the mermaid syntax.
You’ll notice a gray block with a simple flowchart appearing. Make sure you’re in Split View mode. The upper part of the split view is where you can enter the code, while the lower part shows the preview of your chart.
Delete
Step 3: Add the Title and Set the Direction

graph LR (left to right)
graph RL (right to left)
graph TB (top to bottom)
graph BT (bottom to top
JavaScript
복사
On the very type, type in
---
title:
---
JavaScript
복사
This is going to be the place where you title the mind map.
← Instead of using graph TD, feel free to change the direction of your chart or mind map to suit your preference. You can adjust it by replacing graph TD with these 4 options
Delete Mermaid —→ Diagram for now.
Step 4: Set the Color Variable

classDef {variable name} fill:{color value}
JavaScript
복사
Replace the variable name with your own custom name (e.g., myColor1) and replace the color value with a CSS color value or hex code. You can find all the available color values in this article.This step is optional for those who want to add color to their mind map. It’s incredibly helpful to predefine color variables, making it easier to use them consistently in the future!
Refer to the code on the left to create a colour variable! You can create as many colour variables as you like :)
How to Use This Mind-Map Template
Step 1: Open Up the Mind map template

Now, I will show you how you can use this template! Go back to the database and click + Create New to create a new entry.
Add the title and among all the available templates, click on the mind-map template that we’ve just created.
Step 2: Create a Node and Define a Shape

We are going to create the first node. A node is structured like this: id[label].
•
id is a unique name given to the node for referencing and connecting it to other nodes.
•
label is the text that will be displayed on the node.
To create a node, type in the id (usually a letter of the alphabet) and enclose the label in brackets.
•
Enclose the label in ((label)) to create a circular node.
•
Use (label) for a rectangle with rounded borders.
•
Use [label] for a standard rectangle.
Step 3: Create Connections
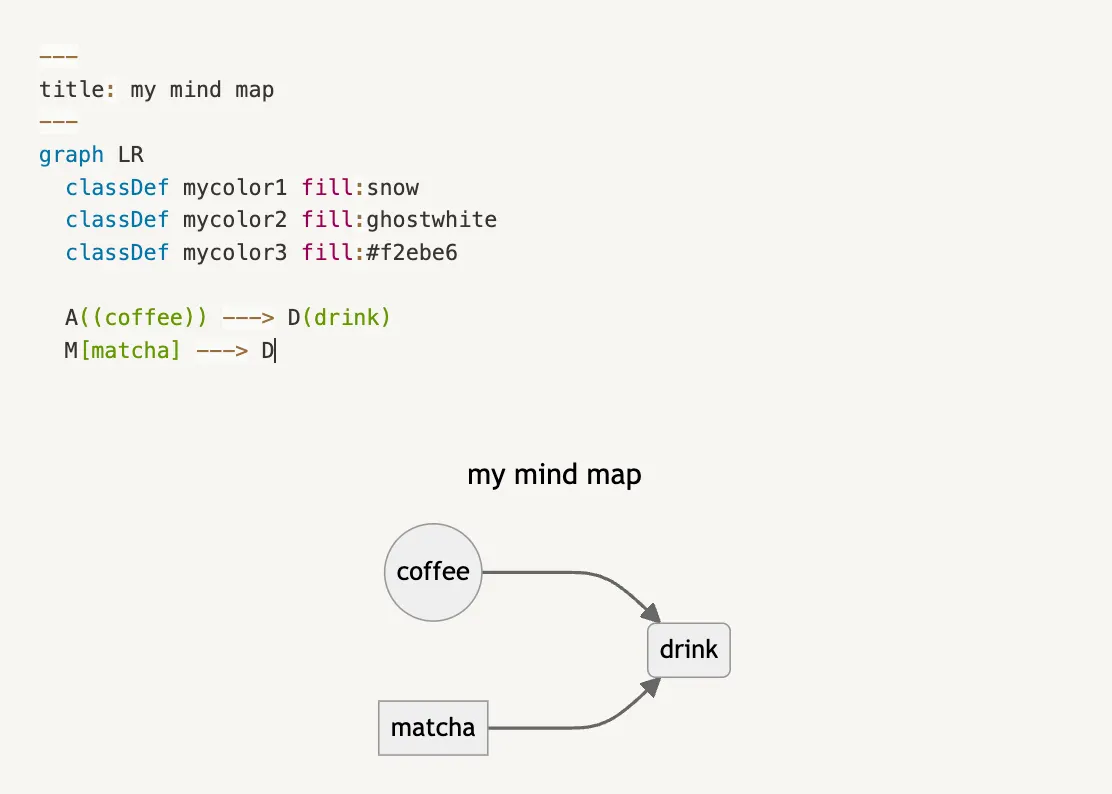
Creating connections between nodes is straightforward. Simply type ---> to add a connection between two nodes.
If you want to create a new connection from an existing node (e.g., after connecting “coffee” to “drink”, you may want to connect a new node like “matcha” to “drink”), you can reference the existing node by its id!
Step 4: All set!

Now you’re all set! This method has been a game-changer for my note-taking. Feel free to get creative with Mermaid code, and if you want to explore even more possibilities, you can always check out the official Mermaid documentation for additional features
Conclusion
Thank you for reading this tutorial! If you found it helpful, be sure to check out shop for my beautiful templates, which I am confident enough to say are a game-changer Subscribe to my newsletter and feel free to follow me on my social media for updates!
Subscribe to my newsletter and feel free to follow me on my social media for updates!Happy Notion(ing)!
links
Search

